Inkline / Installation
A shell on your tablet.
A clear way back.
Install Inkline once, then add the utilities you want. These bundles are for reMarkable 2 on firmware 3.27; they use the stock system libraries where compatible.
01 / Install Inkline
A small change.
A clear way back.
For reMarkable 2 on the 3.27 firmware line. Establish SSH access and verify your tablet’s host key first. Other tablet models and firmware lines are not supported by this installer.
Download. Check. Install.
Download the bundle and its checksum using the links here. No compiler, SDK, or extra tablet package manager is needed. In your computer’s terminal, open the folder containing both files and run:
scp -o StrictHostKeyChecking=yes inkline-rm2.tar.gz inkline-rm2.tar.gz.sha256 root@10.11.99.1:/tmp/
ssh -o StrictHostKeyChecking=yes root@10.11.99.1
Then run this block in the tablet’s SSH session. It verifies the checksum and checks compatibility before installing:
sh <<'INKLINE_INSTALL'
set -eu
cd /tmp
sha256sum -c inkline-rm2.tar.gz.sha256
inkline_stage=$(mktemp -d /tmp/inkline-install.XXXXXX)
trap 'rm -rf -- "$inkline_stage"' EXIT
trap 'exit 130' HUP INT TERM
tar -xzf inkline-rm2.tar.gz -C "$inkline_stage"
"$inkline_stage/inkline/install-device.sh" --check
"$inkline_stage/inkline/install-device.sh"
rm inkline-rm2.tar.gz inkline-rm2.tar.gz.sha256
INKLINE_INSTALL
The preflight checks firmware, stock Qt libraries, the font, RAM mounts, swap policy, and application startup. It does not stop your notebooks.
When installation finishes, type exit to close SSH. Use Opt+RightAlt+T on the tablet to open Inkline. An update preserves any open terminals; quit and reopen once to use the new version.
What gets installed, and what can write to flash?
Inkline installs a launcher at /home/root/inkline and versioned bundles under /home/root/.local/share/inkline. It also enables a small systemd keyboard shortcut service. It uses the tablet’s stock Qt libraries. Runtime caches live in a service-owned RAM directory. Installation requires RAM-backed /tmp, /dev/shm, and /run, plus zero swap.
Stored images are bounded; kitty file and temporary-file transports are disabled. All settings stay in RAM and save together to ~/.config/inkline/settings.ini on normal exit. Finger lifts, closing Settings and sleep do not write preferences; unchanged sessions write nothing. The startup logo uses inline kitty graphics. Installation, saved documents and programs can still write files or caches.
Your first terminal
A few keys.
Nine places to work.
Every new terminal opens with a short guide and a tiny Goblin logo. On Type Folio, hold the separate Opt key between Ctrl and Alt and press 1–0 for F1–F10. Use the right Alt/Opt key for the shortcuts below.
| Right Alt/Option + | Action |
|---|---|
| Tab | Escape |
| Up / Down | PageUp / PageDown |
| Left / Right | Previous / next terminal, across nine slots |
| 1–9 | Select terminal slot 1–9 |
| Space | Open or close Settings |
| Backspace | Quit, with confirmation |
| C / V | Copy selected text / paste the RAM clipboard |
The rightmost bottom button and right Alt/Option+Space open Settings, even when the bar is hidden. Left Alt+Space opens the Unicode keyboard. Ctrl+Shift+B passes through to terminal programs, including Emacs. Caps Lock can act as Control (the default) or Caps Lock. A solid fill marks the active choice; a dashed outline marks keyboard focus. All settings, including font size, input method, contrast and update mode, stay in RAM and save when Inkline exits normally.
The four-part bottom bar shows Escape, current battery state, Quit, and Settings. Run inkline-battery or ~/inkline battery for percentage and charging state; Inkline also puts the compact percentage in its no-color shell prompt. Battery polling uses the read-only kernel interface and does not write to storage. Visiting an empty terminal slot starts a shell. Each terminal keeps its own programs, live screen and graphics; scrollback is disabled. The terminal indicator counts open terminals; nine is the limit. Type exit to close one; Quit asks before closing all of them.
The automated Folio/USB shortcut tests pass on the tablet. Physical checks for the new shortcuts, keyboard LEDs, and USB hotplug remain. Complete keyboard instructions ↗
Text, touch, and languages
Make yourself understood.
Change your input method at any time, then return to normal US typing through the same menu. The controls work with Type Folio and USB keyboards.
- Press right Alt/Option+Space to open Settings. Left Alt+Space opens the Unicode keyboard.
- Open Input method. Tap a method, or select it with Up/Down and Enter.
- To return to normal US typing, select Off — direct keyboard. This turns off composition; Inkline’s shortcuts remain available.
The selected method applies to all nine terminals and is saved across restarts. Each terminal keeps its own unfinished composition. A solid fill and filled circle mark the active method; the dashed outline marks keyboard focus.
| Choose in Input method | What you can type |
|---|---|
| Off — direct keyboard | English and ordinary US keyboard input, with no composition. |
| Romaji — Japanese hiragana | Japanese hiragana: nihongo → にほんご. No kanji conversion. |
| US-International — accented letters | Common Latin accents: 'e → é, ~n → ñ, "u → ü. This is a limited accent table, not a complete national keyboard layout. |
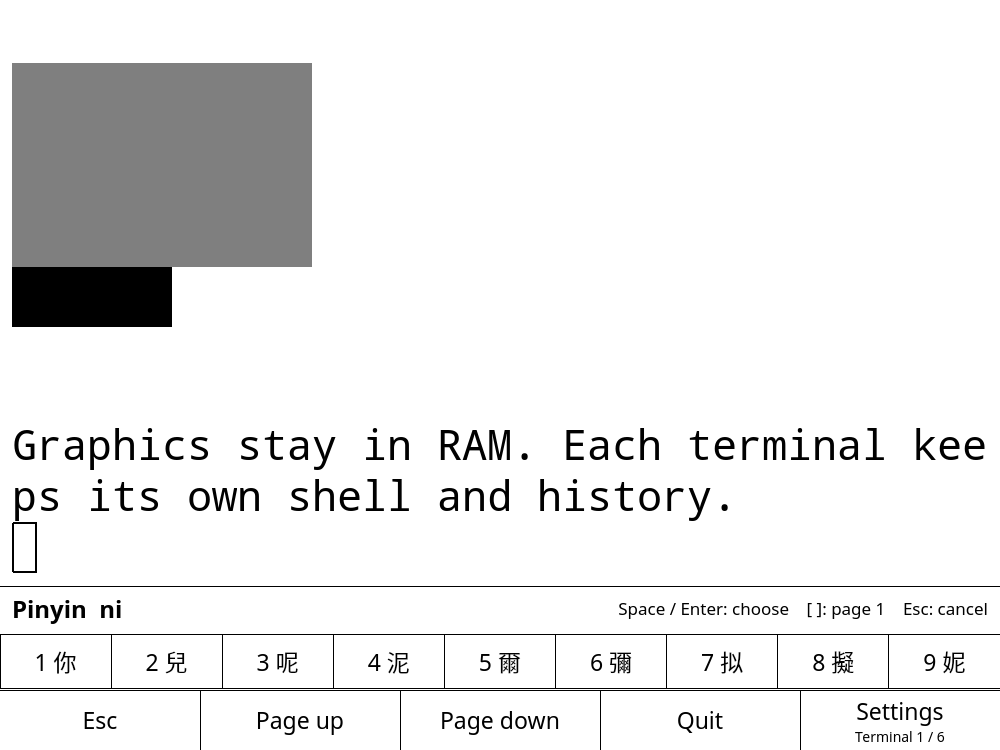
| Pinyin — Chinese | Chinese syllable candidates: ni + Space → 你. |
| Zhuyin — Chinese (basic layout) | Basic Bopomofo mapping: su + Space → 你. This is not a complete Taiwanese input method. |
| Wubi 86 — Chinese | Chinese shape codes: a + Space → 工. |
On the US Type Folio, right Alt/Opt + 0 types +. Hold right Alt/Opt and press the minus key immediately left of Backspace to type =. With input method Off, Shift+6 types a literal ^, so c^2 stays as typed. Select US-International when you want accented letters.
Choose a Chinese candidate.
Type a syllable or code. Space or Enter chooses the first candidate; 1–9 or a tap chooses another. Use [ and ] to change pages, Backspace to edit, and Escape to cancel. With Zhuyin, number keys assigned to Bopomofo enter sounds; tap a candidate to select it. On Type Folio, right Option+Tab sends Escape.
The website’s language selector changes these pages only. Use the tablet’s Input method menu to change typing. The app’s menu labels are shown in English here so you can find the same labels on your tablet.
Copy with a touch.
Drag a finger across terminal text, then press right Option+C. If an app requests mouse input, hold Shift to select text with the pen or mouse. Switch terminals and use right Option+V to paste. Wrapped lines and Unicode are preserved. The 128 KiB text clipboard stays in RAM, is shared by all nine terminals, and supports OSC 52. It is separate from the notebook clipboard and clears when Inkline closes.
Cut belongs to the editor. Terminal output is read-only. Option+X copies the selection and explains how to cut in the running editor; OSC 52 alone cannot delete document text. Programs that forward OSC 52 can set or query Inkline’s clipboard.
Touch controls and shell basics.
Scrollback is disabled to conserve RAM. Swipe two fingers left for the next terminal or right for the previous one. One finger selects text. The pen acts as a mouse when requested by an app; hold Shift to select text instead.
Each terminal keeps only its live and alternate screens. Graphics leave the shared compressed RAM arena when their anchors leave the live screen or memory is scarce; no graphics cache is written to flash.
Inkline sets HOME=/home/root for its shells, so cd without arguments takes you home. Quit and reopen Inkline after updating to apply this fix.
A size that suits the page.
Pinch with two fingers to change text from 6 to 48 pixels. The gesture now responds at about half its previous rate and adjusts in one-pixel steps for finer control. Existing shells stay running and resize with the text. Settings also has minus and plus buttons. Keyboard zoom combinations have been removed.
Text darkness
Normal text is pure black. In Settings, drag Text darkness to adjust letter edges; 50% is the original rendering. Tab selects the slider and Left/Right adjusts it. Colors and graphics are preserved. The value stays in RAM during use and saves on normal Inkline exit.
Inkline starts Bash, which reads the tablet’s ~/.bashrc. Quit and reopen Inkline after upgrading to use the new launcher.
Physical pinch, pen, Folio, and USB acceptance checks remain. Complete input and clipboard instructions ↗
Unicode, contrast, and updates.
Left Alt+Space opens the Unicode keyboard. Scroll by touch or use arrows and page keys; Tab changes category. Type a hexadecimal codepoint and press Enter to insert it. Escape or Done closes the keyboard; F2 opens Settings. Available glyphs depend on the installed fonts.
The minimum contrast slider separates text from its background. It defaults to 35%; text darkness defaults to 50%. Both stay in RAM during use and save on normal exit. A crash or forced shutdown can lose unsaved setting changes.
Choose an update profile in Settings: Fast favors speed; Balanced uses UI updates; Crisp favors grayscale quality and is the default; Mono uses black and white; Saver batches output. Settings save on normal exit. Previously saved choices are preserved.
Your programs, one shortcut away.
Settings → Command shortcuts (page 2) lets you assign a command to a letter. Choose Terminal or Native e-paper app, then Save. Remove asks for confirmation; Reset draft discards edits. T is locked. Only Save and confirmed Remove write to storage. The command-line tool manages the same bindings.
All global shortcuts now use Opt+RightAlt, including T and the held Backspace recovery chord. Use the Folio’s separate Opt key; on USB keyboards use Windows/Command (Super). Ordinary Ctrl+Alt remains available to Emacs. Quit and reopen Inkline after upgrading; installation preserves open terminals.
Run these commands on the tablet. The example registers Opt+RightAlt+E to open Emacs in a new terminal, lists bindings, then removes that binding. Arguments are stored literally. Shortcut programs read your Bash settings, including optional Python cache preferences.
~/inkline shortcut register e emacs
~/inkline shortcut list
~/inkline shortcut deregister e
For a program that draws its own e-paper screen, use ~/inkline shortcut register a --epaper /home/root/my-app. Inkline pauses while it runs and resumes when it exits or crashes. Logs and runtime caches stay in RAM.
Opt+RightAlt+T is permanent. It cannot be registered or deregistered. It stops a native shortcut app and returns to Inkline with existing terminals intact. RightAlt is the Alt/Opt key to the right of the spacebar. Hold it with the separate Opt key; do not hold Ctrl.
Hold Opt+RightAlt+Backspace for two seconds for emergency recovery. This kills the shortcut app and every Inkline terminal, then opens a fresh shell. Unsaved work in those sessions is lost. A program that grabs input exclusively or exhausts the system can defeat recovery; restarting the device is the final fallback.
Complete program shortcut instructions ↗
Keep the manual on your tablet.
The installer includes one PDF manual in nine languages, with a language index. To import it into My files, enable the USB web interface and leave notebooks open during installation. Otherwise, quit Inkline and run ~/inkline manual from SSH after enabling the interface, or import the PDF yourself. The installer never edits notebook metadata directly.
Power button and saved settings
Press and release the physical power button to suspend; press again to wake. Settings save when Inkline exits, not during sleep. An update preserves your open terminals, so quit and reopen Inkline once to activate the new sleep handling. Save your work before testing physical sleep and wake.
Remove older utility releases
After upgrading a utility, preview old releases with ~/inkline cleanup emacs --check, then reclaim them with ~/inkline cleanup emacs. Replace emacs with another utility name if needed. Current and in-use releases are kept; close old programs and retry. Your documents and editor configuration are preserved.
Wi-Fi on the tablet
Settings page 4 shows nearby and saved networks, signal, security, and the current connection. Choose Connect or Forget with touch or keyboard.
inkline-wifi status
inkline-wifi list
inkline-wifi pick
~/inkline wifi list
Passwords are masked and kept out of arguments, logs, and shell history. Enterprise, WEP, and SAE-only networks are shown but are not configured in this preview.
USB keyboard and typewriter
Install the Python utility, then open Settings → USB (page 3). Choose Network, Send keyboard or Receive keyboard. For outgoing typing, connect the computer over USB-C, choose its profile, and open Typewriter. Live typing edits the local document and sends each character. Pause live edits locally and displays a black PAUSED · USB OUTPUT OFF badge; Exit typewriter returns to USB settings.
Open Files & send to load or save any UTF-8 filename, choose 5–80 characters per second, send the entire editor, or stop. Edits remain in RAM until explicit Save or normal Inkline exit; an untitled document uses a hidden recovery name at exit.
Mac needs Unicode Hex Input; Linux needs a compatible Ctrl+Shift+U input method. Windows needs WinCompose with Right Alt as Compose and Unicode input enabled. Use a US layout and turn Caps Lock off. The US/ASCII profile rejects non-ASCII text; Mac accepts characters through U+FFFF.
Input method offers Off/direct US, Romaji, Pinyin, Zhuyin, Wubi 86 and US-International. Choose Off to return to normal US typing. Only committed characters are sent. Left Alt+Space opens the Unicode picker. Bundled Noto and GNU Unifont fallbacks provide broad glyph coverage.
~/inkline usb send-keyboard
keyboard-send --file notes.txt --profile windows --dry-run
keyboard-send --file notes.txt --profile windows --start-delay 3 --cps 20
keyboard-send --stop
~/inkline usb network
Files stream through a small read buffer, without a fixed size limit or temporary spool files. Ordinary files are fully validated before sending; keep the source unchanged. Pipes are checked as they arrive and may be partially sent before an error. Inspect the receiving document before retrying an interrupted send.
Exit, crash and emergency cleanup restore USB networking. Change modes from the tablet or Wi-Fi SSH; USB SSH cannot disconnect itself. An active satellite PPP session or an unknown gadget keeps ownership of the port. For timed recovery, run ~/inkline usb recover-after 90 before switching.
The PDF manual has complete host setup, commands and recovery instructions in nine languages. Download it here and import it with the reMarkable app if you want it in My files.
02 / Add utilities
Pick a tool.
Keep it close.
Choose a package, then download it on your computer and copy it to the tablet over USB networking. The tablet checks its checksum and compatibility before installing it under your home directory. Use the SSH access and verified host key established when installing Inkline.
1. On your computer
Run these commands in a folder for your downloads. The last command opens a shell on the tablet.
curl -fLO https://inkline.goblinreactor.com/downloads/utilities/2026-09-13/goblin-mosh-rm2.tar.gz &&
curl -fLO https://inkline.goblinreactor.com/downloads/utilities/2026-09-13/goblin-mosh-rm2.tar.gz.sha256 &&
scp -o StrictHostKeyChecking=yes goblin-mosh-rm2.tar.gz goblin-mosh-rm2.tar.gz.sha256 root@10.11.99.1:/tmp/ &&
ssh -o StrictHostKeyChecking=yes root@10.11.99.1
2. In the tablet’s SSH session
sh <<'INKLINE_UTILITY'
set -eu
utility=goblin-mosh
cd /tmp
sha256sum -c "$utility-rm2.tar.gz.sha256"
utility_stage=$(mktemp -d /tmp/inkline-utility.XXXXXX)
trap 'rm -rf -- "$utility_stage"' EXIT
trap 'exit 130' HUP INT TERM
tar -xzf "$utility-rm2.tar.gz" -C "$utility_stage"
"$utility_stage/$utility/install-device.sh" --check
"$utility_stage/$utility/install-device.sh"
rm "$utility-rm2.tar.gz" "$utility-rm2.tar.gz.sha256"
INKLINE_UTILITY03 / TeX for the tablet
Enough TeX to write.
Room for your notebooks.
First install the TeX Live utility above and connect the tablet to Wi-Fi. It provides the installer, Perl runtime, and HTTPS downloader. Then run:
texlive-install --check
texlive-install
This installs scheme-basic, LuaLaTeX, Latin Modern fonts, and the packages Purrfect needs. The installed TeX tree occupies about 188 MiB including generated formats. Its private installer/runtime adds 80 MiB; allow 350–500 MiB overall for installation and growth. The installer requires at least 384 MiB free for the TeX tree. Documentation and source copies are omitted by default.
This keeps ordinary PDF export available offline. Add packages as you need them with tlmgr install PACKAGE. For large documents or unusual fonts, a full TeX installation on another computer is also available through a remote shell over Goblin Mosh.
See the official TeX Live installation guide and Python 3.15.0rc2 release notes. Package sources and licenses are available on the source page.
Curated LaTeX setup
For writing LaTeX on the tablet, add the small set of packages used by the Inkline writing examples instead of three broad TeX Live collections. The compact installation already supplies geometry, Latin Modern, xcolor, tabularx, hyperref, and fancyhdr; this step adds microtype, enumitem, titlesec, parskip, needspace, extsizes, and lastpage.
export TMPDIR=/tmp
tex_packages() {
  tlmgr --package-logfile /tmp/tex-packages.log \
    --command-logfile /tmp/tex-commands.log "$@"
}
tex_packages option docfiles 0
tex_packages option srcfiles 0
tex_packages install microtype enumitem titlesec parskip needspace \
  extsizes lastpage
Measured from the installed TeX Live 2026 package database and allocated blocks on reMarkable 2, the compact package files use 183.1 MiB and this curated set uses 183.9 MiB. Generated formats bring a fresh curated TeX tree to about 188.8 MiB; with the 80.0 MiB installer/runtime, budget about 268.8 MiB installed. Keep at least 384 MiB free for installation and growth. These commands omit documentation and source downloads and keep package-manager logs in /tmp.
If the three broad collections from the former recommendation are already installed, adding this list does not remove them. To reclaim that space, remove and reinstall the TeX tree, then run the curated command above:
texlive-remove
texlive-install
Removal preserves your documents and /home/root/texmf. Reinstallation rewrites the TeX tree, so do it only when the recovered space is worth the flash writes.
Python setup
Choose what gets cached.
The Python 3.15.0rc2 package uses unmodified upstream code. On the tablet, add these lines to /home/root/.bashrc, then run source ~/.bashrc:
export PYTHONDONTWRITEBYTECODE=1
export PIP_NO_CACHE_DIR=1
PYTHONDONTWRITEBYTECODE=1 prevents bytecode writes during imports. PIP_NO_CACHE_DIR=1 disables pip’s download and wheel cache. To prevent pip’s separate installation-time bytecode compilation, use python3 -m pip install --no-compile PACKAGE.
Stock Python’s isolated mode ignores Python environment settings, including during the usual virtual-environment pip bootstrap. For a method that skips this bootstrap, certificate setup, and verification commands, read the complete Python guide. Existing caches and application file writes are unaffected.
Emacs / LaTeX previews
Write TeX.
See the page.
Install the Emacs utility, then TeX Live and its compact collection with texlive-install. Finally, select ghostty-tex in the utility installer above. Restart Emacs inside Inkline to load the add-on.
emacs paper.texC-c C-c saves and compiles your source, with the PDF on the left and source on the right. C-c C-v shows the output again. Use M-n / M-p or C-c n / C-c p to change pages. C-u C-c C-c opens the AUCTeX command prompt for tools such as BibTeX.
Emacs copies and kills use OSC 52. Inkline’s right Alt/Opt+V pastes the tablet clipboard. Run this setup directly inside Inkline; the profile uses inline Kitty graphics and direct image placement.
Keep the finished PDF.
Run M-x inkline-ghostty-tex-save-pdf from the source pane and choose a destination. This deliberately saves a permanent copy.
04 / Tailscale
Connect to your tailnet.
From installing the package to your first remote shell and Git clone. Follow these steps once, then connect directly from Inkline whenever you need your other computer.
1. Prepare both devices
On the remote computer, install Tailscale, sign in, and enable its ordinary SSH server. On macOS, enable Remote Login; on Linux, enable sshd. Note the remote account name with whoami.
On the tablet, install the Tailscale utility above, connect to Wi-Fi, and open Inkline with Opt+RightAlt+T. The service starts automatically, including after a reboot.
2. Open your tablet’s sign-in link
Run this inside Inkline:
tailscale up --accept-dns=false --accept-routes=false --hostname=remarkable2Leave the command running. Open the entire HTTPS link it prints in a browser on your phone or computer. Sign in to the same Tailscale account as the remote computer and approve the tablet. If device approval is enabled, ask your administrator to approve it in the Tailscale admin console.
The link belongs to your tablet and expires. Use the link your command prints; there is no shared sign-in URL. After approval, the command returns to the shell.
Check the connection below. Replace workstation with the remote computer’s name from the status output, or its Tailscale IP address. A pong, including one through a relay, confirms tailnet connectivity.
tailscale status
tailscale ip -4
tailscale ping --c 3 workstation
3. Prepare your SSH key
The tablet uses Dropbear SSH and expects its private key at ~/.ssh/id_dropbear. If that key already works, keep it. Otherwise, choose one option below. Both commands preserve an existing key.
Convert an existing OpenSSH key
For an unencrypted ~/.ssh/id_ed25519 key, run this on the tablet. The original stays in place and the public identity stays the same. A key already authorized on your server or GitHub does not need to be registered again. For an encrypted key, use the new-key option instead.
(
  set -eu
  umask 077
  mkdir -p ~/.ssh
  chmod 700 ~/.ssh
  if test -e ~/.ssh/id_dropbear || test -L ~/.ssh/id_dropbear; then
    printf '%s\n' 'Existing id_dropbear preserved.'
  else
    /usr/sbin/dropbearmulti dropbearconvert openssh dropbear ~/.ssh/id_ed25519 ~/.ssh/id_dropbear
    chmod 600 ~/.ssh/id_dropbear
  fi
)
Create a new key on the tablet
Run this inside Inkline to generate a native Ed25519 key, then authorize its public key in the next step.
(
  set -eu
  umask 077
  mkdir -p ~/.ssh
  chmod 700 ~/.ssh
  if test -e ~/.ssh/id_dropbear || test -L ~/.ssh/id_dropbear; then
    printf '%s\n' 'Existing id_dropbear preserved.'
  else
    /usr/sbin/dropbearmulti dropbearkey -t ed25519 -f ~/.ssh/id_dropbear
    chmod 600 ~/.ssh/id_dropbear
  fi
)
4. Authorize the public key
In Inkline, print the public key. Copy the whole line beginning with ssh-ed25519 for a key created above. Share this public line; keep the private key file on the tablet.
/usr/sbin/dropbearmulti dropbearkey -y -f ~/.ssh/id_dropbear | awk '$1 ~ /^(ssh-|ecdsa-)/ { print }'On your remote Linux or macOS computer, open a terminal as the account you will SSH into and run:
umask 077
mkdir -p ~/.ssh
chmod 700 ~/.ssh
printf '\n' >> ~/.ssh/authorized_keys
cat >> ~/.ssh/authorized_keys
Paste the public key as one line, press Enter, then Ctrl+D. This appends to the file. Finish by running:
chmod 600 ~/.ssh/authorized_keysFor GitHub, open New SSH key, choose Authentication Key, paste the public line, and save. Tailscale sign-in does not register your SSH key with servers or GitHub.
5. Connect over SSH
Back in Inkline, replace alice with the account name on your remote computer and workstation with its tailnet name or IP address. Your SSH account name may differ from your Tailscale account.
tailscale-ssh alice@workstationOn the first connection, verify the host-key fingerprint against the remote computer before accepting it. Type exit to return to Inkline. For a custom port, use tailscale-ssh -p 2222 alice@workstation.
6. Clone and keep using Git
Install the Git utility on the tablet, and install Git on the remote computer too. For an existing repository on your tailnet, substitute your account, host, and repository path. Here, git/notes.git is relative to the remote account’s home directory.
mkdir -p ~/dev
GIT_SSH_COMMAND=tailscale-ssh git clone alice@workstation:git/notes.git ~/dev/notes
git -C ~/dev/notes config core.sshCommand tailscale-ssh
git -C ~/dev/notes pull
The clone uses the helper once; the repository setting saves it for future pulls, fetches, and pushes. For an existing tailnet repository, run the same configuration command with its local path.
GitHub uses the tablet’s normal internet connection. After adding the public key to GitHub, replace OWNER and REPO below. Use a colon after the hostname. This GitHub example does not need the Tailscale helper.
mkdir -p ~/dev
git clone git@github.com:OWNER/REPO.git ~/dev/REPO
When connecting to GitHub for the first time, check its published SSH host-key fingerprints.